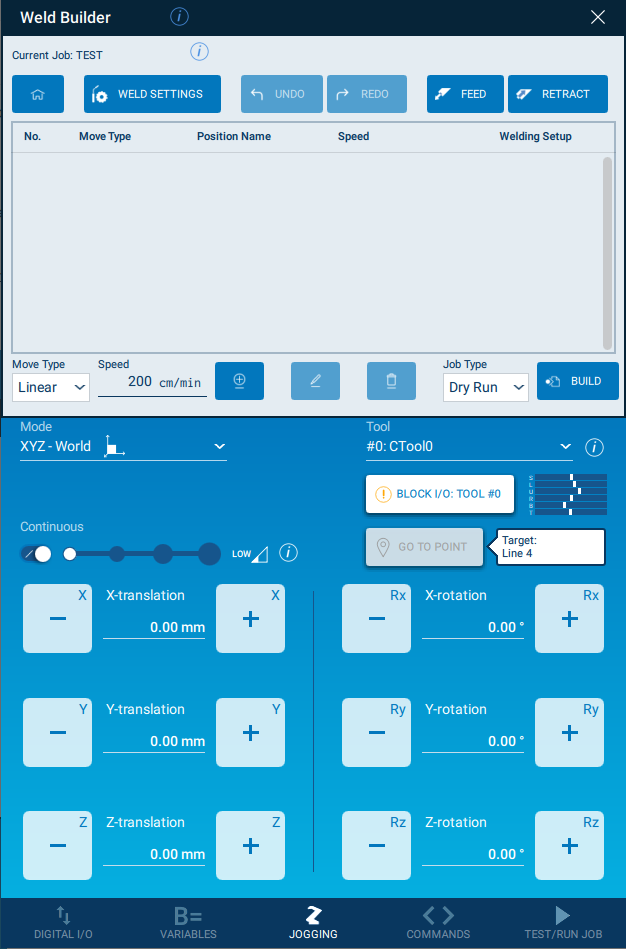
On the Program Page you can edit a specific Weld Builder job, switch to the Weld Settings page, and create and run the finished robot job.
The Program Page is divided into two parts: In the upper part the job is processed and in the lower part the communication with the robot takes place via the Jogging Panel.
In the upper part there is displayed the job name that is currently opened. There are two navigation buttons below it: The button with the house-icon closes the current job and get back to the Job Manager. Via the Weld Settings button the Weld Settings Page is opened to set the weld parameters.
Pressing and holding the Feed and Retract buttons extends or pulls back the wire.
The table displays all elements in rows of the job.Therefor it has five columns: No., Move Type, Position Name, Speed and Welding Setup. Each element of the job has these five properties and are displayed one below the other in the table. In addition, each element has coordinates of a robot position. The job and thus the robot moves the elements in the table from top to bottom.
- No.: This number indicates the order in which the robot approaches the position
- Move Type: The Move Type specifies with which movement type the robot approaches the position
- Position Name: The user can assign this name individually
- Speed: The speed indicates how fast the robot approaches the respective position in cm/min
- Welding Setup: The Welding Setup indicates whether there is a welding process up to this position, and if so, which one

Add a new element
First, the robot is moved to the corresponding position via the Jogging Panel. Then the movement and speed with which the robot is to move to the corresponding position is set by the drop-down menu and the text field next to the Add button.
If the table with the robot elements is empty, the moved position can be added by Add. If the table already contains one or more elements, the element is selected from where the robot should move to the point to be added. Then the new position can be added by Add. By default, the Welding Setup is set to Inactive and must be set manually if a weld section is desired:
Welding Setup
Delete an element
To delete an element from the job, it must be selected in the table. Then the selected element can be deleted via the Delete button.
Edit an element
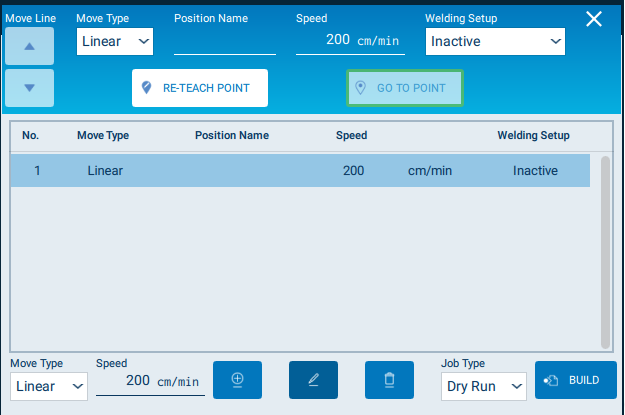
Each element can also be adjusted again. To do this, the corresponding element must be selected in the table and then press the Edit button. Then the edit panel appears in the upper area with the current values of the selected element. It’s possible to close the edit panel by clicking the x button or the Edit button again.

Move line
To change the order in which the robot moves to each position, it must correspond to the order of the elements in the table. To move a row up or down in the table for this purpose, the corresponding element in the table must be selected. Then this element can be moved up or down using the two arrow keys in the edit panel ( open edit panel ).
Change Move Type
To change the Move Type of an element that is already included in the job, the corresponding element must be selected in the table. The current Move Type is displayed in the edit panel ( open edit panel ) and can be adjusted using the drop-down menu. The speed and speed unit will be updated and the default values will be set.
Set position name
The optional function of naming a position can be done in the edit panel ( open edit panel ). Therfor the corresponding element must be selected in the table. If the element already has a name it will be displayed in the text field. To assign a name, the text field must be selected under Position Name and the name can be entered in the displayed keyboard.
Change Speed
To change the speed of a certain element, the corresponding row must be selected in the table. The speed can be entered in the text field in the edit panel ( open edit panel ) via the displayed keyboard. The speed unit is set automatically depending on the chosen Move Type.
Select Welding Setup
To define a section as a weld section, the previously defined weld name must be assigned to the position to be welded. To do this, select the corresponding element in the table and select the weld name in the drop-down menu in the edit panel ( open edit panel ). If a previously defined welding section is now to be performed without welding, the corresponding element is selected in the table and Inactive is selected in the drop-down menu.
Change coordinates
To change the position coordinates of a certain element, the corresponding row must be selected in the table. The coordinates can be changed via the Re-Teach Point button in the edit panel ( open edit panel ). Before clicking the button, the robot has to be moved to the new position via the Jogging Panel.
Go to point
To move the robot to the position of a specific element, this element must be selected in the table. Then the robot can be moved to the position by pressing and holding the Go To Point button in the edit panel ( open edit panel ). When the robot has reached the position, the bordercolor of the button will be green, otherwise the color is orange.
Build and run job
If a job is successfully created and all elements have been added with the correct parameters, the Run Type must be selected from the drop-down menu.
By default, Dry Run is selected to avoid accidental welding.
Weld Run will run the job in weld mode, which is only available when the key is switched to “Run”.
Afterwards, the Build button can be used to transform the job to a valid Inform job. A pop-up window will appear during the conversion. When the conversion is complete, a pop-up appears indicating whether the conversion was successful or failed. If the conversion failed, the pop-up will describe what error occured so it is possible to fix it and try again. If the conversion was successful, the Test/Run Job Panel opens and the job can run whether in Teach or Run mode.